This is a simple tutorial to create "slide to unlock" feature. As you may have guessed, we have to use UISlider. UISlider is an awesome object for many purposes - adjusting parameters of an object, or values of anything (size, amount, etc). But this time we will use it as a "Unlock Key". This type of control is useful when you have an app doing something and the user then puts the iPhone in his pocket while the app is still running. If we just use a normal UIButton to unlock, the user could accidentally touched it while the phone is in the pocket, and unlocked the screen of the app, accidentally. This is the same application as the normal iPhone lock feature.
The lockButton is just a control to enable you to enter the "Locked" status. Also we will be needing 3 methods to help us implementing the "Slide to Unlock" feature in our app.
So, how do we go about implementing it. We need to think of the behaviour, of course. We want the user to slide the slider ball until the very end (right hand side), only then the screen be unlocked. Also, if the user slides half way or not until the very end, and let go (untouch) of the slider ball, we need to slide back the slider ball into initial position (value = 0, at the most left side).
Translating that behaviour into code means: Since the behaviour depends on untouch action, therefore we will use the "Touch Up Inside" delegate of the UISlider. So we will connect the "Touch Up Inside" method to the UnLockIt method.
Let's take a look inside the UnLockIt method - we need to check the value of slider (which equals to the location of the slider ball), and translate the behaviour we stated above into codes:
-(IBAction)UnLockIt {
if (!UNLOCKED) {
if (slideToUnlock.value ==1.0) { // if user slide to the most right side, stop the operation
// Put here what happens when it is unlocked
slideToUnlock.hidden = YES;
lockButton.hidden = NO;
Container.hidden = YES;
myLabel.hidden = YES;
UNLOCKED = YES;
} else {
// user did not slide far enough, so return back to 0 position
You notice that we also declare a global variable of type BOOL to check the state of the lock. If the slider ball is at the most right, the value is 1.0 (this is the default max value of a UISlider, you can change in IB if you want), then execute the method to unlock it, in this example, just to hide the slider, label and so on and display the Lock button. If it is not reaching to the right side, then we use CoreAnimation to animate the auto sliding of the slider ball back to initial position of 0.0 (which is at the most left hand side).
Note that I use the UIViewAnimationCurveEaseOut, this animation curve starts out very fast immediately and then slows down at the end. This is to make it similar to a spring reaction.
You also notice we added a label in there. Now, if you see the label in your iPhone, it fades out as you slide the slider towards the right side, we can accomplish this by tying the "Value Changed" delegate of the UISlider to the method fadeLabel as below:
-(IBAction)fadeLabel {
myLabel.alpha = 1.0 - slideToUnlock.value;
}
This is simple really. Whenever we move the slider ball from left to right, the value of the slider (that we named slideToUnlock), will increase from 0 to 1.0. But we want to change the label's alpha (opacity) from 1.0 to 0.0, therefore a simple invert is done by taking the max value of slideToUnlock and subtracting it to its current value. A better code would be to use
especially if you changed the maximum value to other than 1.0.
That's done with the behaviour of the slider. Now, what's left is just to customize the UISlider with custom slider ball. I also put a UIImageView (Container) at the back to align it nicely with the slider ball. You could also use the container image as the Slider's minimum and maximum track images.
NOTE: Just a little note, the customizing of UISlider must be done at viewDidLoad, otherwise the slider won't be made custom for some reason.
So under viewDidLoad (or if you wish you can put it under applicationDidFinishLaunching), we put the customization code of the UISlider:
// I set the track images to be nothing (just a clear image)
UIImage *stetchLeftTrack= [[UIImage imageNamed:@"Nothing.png"]
stretchableImageWithLeftCapWidth:30.0 topCapHeight:0.0];
UIImage *stetchRightTrack= [[UIImage imageNamed:@"Nothing.png"]
stretchableImageWithLeftCapWidth:30.0 topCapHeight:0.0];
// this code to set the slider ball image
[slideToUnlock setThumbImage: [UIImage imageNamed:@"SlideToStop.png"] forState:UIControlStateNormal];
[slideToUnlock setMinimumTrackImage:stetchLeftTrack forState:UIControlStateNormal];
[slideToUnlock setMaximumTrackImage:stetchRightTrack forState:UIControlStateNormal];
-JSON 2중 뎁스 이상 키 접근하기-
NSDictionary*feed =[self downloadPublicJaikuFeed];
// get the array of "stream" from the feed and cast to NSArrayNSArray*streams =(NSArray*)[feed valueForKey:@"stream"];
// loop over all the stream objects and print their titlesint ndx;
NSDictionary*stream;
for(ndx =0; ndx < stream.count; ndx++){
NSDictionary*stream =(NSDictionary*)[streams objectAtIndex:ndx];
NSLog(@"This is the title of a stream: %@", [stream valueForKey:@"title"]);
}
-배열 NSArray-
초기 데이터로 생성
NSArray *array = [[NSArray alloc] initWithobjects:추가할 객체들.. , nil];
스트링으로 생성
NSArray *joins =(NSArray*)[result objectForKey:@"joins"];
길이 구하기
NSLog(@"Array size : %d " , sizeof(BUILDING_DATA) / sizeof(BUILDING_DATA[0]));
-랜덤 출력-
srandom(time(NULL));
value = random() % 100;
위처럼 하시면 0~99사이의 한수를 리턴합니다.
srandom(time(NULL)); 는 첨에 한번만 해주시면 됩니다.
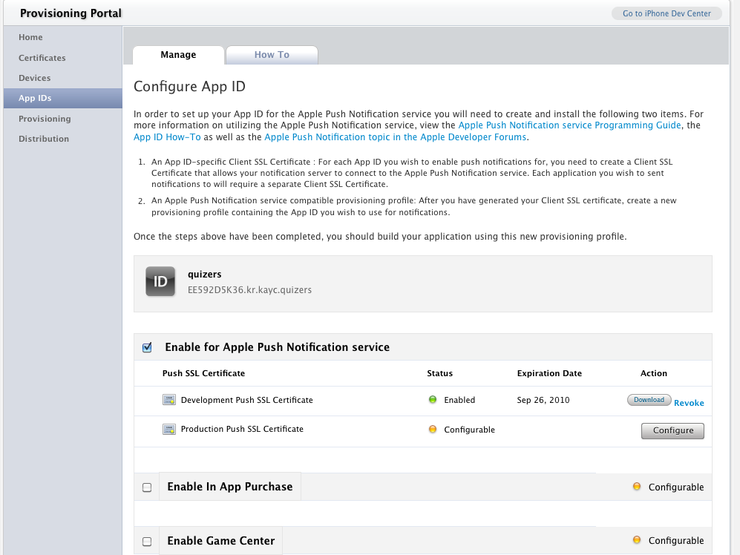
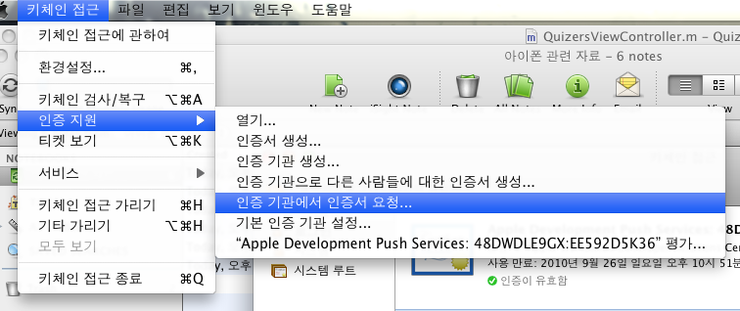
-Code Sign error: Provisioning profile이 맞지 않을 때 변경 방법-
여러 장비에서 작업을 하거나 여러 프로젝트를 진행 중에 변경된 Provisioning profile이 적용되지 않아 Debug를 할 때 ”Code Sign error: Provisioning profile ‘3E6AA725-6534-46F8-B9CE-D19AC9FD854B’ can’t be found” 이런 오류가 발생하는 경우가 있는데요. 이럴 때 현재 사용중인 Provisioning Profiles로 프로젝트 세팅을 변경해주는 방법을 소개한 글(원문)이 있어서 공유합니다.
1. 실행중인 Xcode Project를 닫습니다.
2. Finder에서 프로젝트 폴더로 이동합니다.
3. 프로젝트 .xcodeproj 파일 선택하고 마우스 오르쪽 키를 눌러 '패키지 내용 보기'를 선택합니다.
4. 패키지 내용 보기를 통해 패키지 안에 있는 project.pbxproj 파일을 Xcode로 불러옵니다.
5. 검색을 통해 PROVISIONING_PROFILE 부분을 찾아 변경된 Provisioning profile 로 변경해줍니다.
6. 현재 Provisioning profile을 확인하려면 Organizer 창을 열어보면 알 수 있습니다.
7. Window > Organizer로 Organizer 창을 열고 왼쪽에 IPHONE DEVELOPMENT > Provisioning Profiles로 이동합니다.
8. 오른쪽에 있는 Profile Identifier를 복사해서 변경해주면됩니다.
9. 변경이 끝나면 project.pbxproj 저장하고 프로젝트를 열어 테스트합니다.
-Accessing Objects in a NSArray-
To access an object in an NSArray, you use the -objectAtIndex: method, as in the following example:NSArray *numbers;
NSString *string;
Of course, you have to be careful not to ask for an object at an index which is negative or bigger than the size of the array; if you do, an NSRangeException is raised (we'll learn more about exceptions in another tutorial).
To get the length of an array, you use the method -count, as in:
NSArray *numbers;
int i;
이런 식으로 에니메이션을 만들었는데 간단하게 UIImageView를 한점에서 다른 한점으로 이동시킵니다.
근데 그래서 에니매이션이 끝나면 다시 또다른 다른 두 좌표로 해서 위의 코드가 실행되서 계속해서 UIImageView를 움직이게 하고 있습니다.
근데 질문은 1. setAnimationDidStopSelector 에서 에니매이션이 끝난것을 알기전에 강제로 에니메이션을 멈출수 있나요?
2. 제 경우에는 어떤 경우에 위 코드가 setAnimationDidStopSelector 가 호출되었을때 만 실행되는 것이 아니라 다른 부분에서도 호출하기도 합니다. 근데 문제는 동시에 위 코드가 중복되어서 호출되면 이상하게 작동해요. 그래서 꼭 위 코드를 실행(에니매이션을 commit 하기전에는 반드시 에니메이션을 강제로 멈추던지 아니면 다른 체크를 해야 할것 같은데.....
혹시 방법이 있으면 부탁드립니다.
꾸벅~
답글 :
[UIView setAnimationsEnabled:NO];
// 에니메이션을 종료 합니다.
-일정시간 딜레이 후 함수 호출-
[self performSelector:@selector(playerStop) withObject:nil afterDelay :1.0f];
-정사각형으로 사진을 CROP 하고, 썸네일 크기에 맞게 리사이즈-
먼저, 출처는 다음 기사입니다.
http://tharindufit.wordpress.com/2010/04/19/how-to-create-iphone-photos-like-thumbs-in-an-iphone-app/
iPhone 사진앨범의 특징은 가로나 세로가 긴 이미지라 할지라도,
정사각형으로 사진을 CROP 하고, 썸네일 크기에 맞게 리사이즈 시킵니다.
위의 기사의 내용을 나름대로 보기 편하게(?) 수정을 했습니다.
함수명 - makeThumbnailImage
파라미터 - 원본 이미지, 리사이즈없이 CROP만 할지 여부, 리사이즈할 정사각형 한변의 길이
리턴값 - CROP 및 리사이즈된 이미지
위 소스를 참고하시면, 이미지를 CROP 하는 방법이나, 이미지를 RESIZE 하는 방법을 참고하실수 있을겁니다.
사족을 붙이자면, 왜 Resize 할지 여부를 따로 분리 시킨 이유는 실제로 사용을 해보면 Resize 루틴에서
많은 CPU 부하가 걸립니다. 그래서 UIImageView 에 contentMode를 UIViewContentModeScaleAspectFit 로 설정해서
자체적으로 리사이즈를 하게 하는 방법이 비동기적으로 괜찮습니다. (물론.. 실제 Resize된 이미지가 아니므로 메모리적인 소비는 있습니다.)
-Xcode3.2.3과 SDK4로 업그레이드 후, 기존 앱 업그레이드 하는 법-
XCode3.2.3 과 SDK4로 버전업한 후, 기존 앱을 업그레이드 할 때 간단한 Tip 입니다.
1. XCode3.2.3과 SDK4로 업그레이드 한다. 별도로 기존 XCode 3.1 버전을 따로 보관할 필요가 없습니다.
2. 기존 앱을 새 XCode3.2.3에서 연다.
3.Group & Files를 right click -> Get Info 후
3-1.General Tab 에서
Project Format 을 Xcode 3.2-compatible 로 바꾼다.
3-2.Build Tab 에서
Base SDK를 iPhone Device 4.0(배포시), 혹은 iPhone Simulator 4.0(테스트시) 로 바꾼다
iPhone OS Deployment Target 을 iPhone OS 3.0 (즉 지원하고자 하는 하위버전으로) 로 바꾼다.
이렇게 하시면 됩니다.
-객체 타입 비교-
if ( [a isKindOfClass:b] )
-문자열 비교-
NSString *strText = idField.text;
if([srText isEqualToString:@"mihr01"])
....
else if([srText isEqualToString:@"mihr02"])
....
else
...
이렇게 하셔도 되고요 완전 같은 스트링이 아니라
-테이블뷰 위에 검색창 붙이는 방법- 테이블뷰 위에 검색창 넣으신 후에, viewDidLoad 메서드 부분에 [table setContentOffset:CGPointMake(0.0, 44.0) animated:NO];해주시면 처음 보여질 때는 검색창이 안 보이다가 밑으로 땡기면 나타나게 됩니다.
-아이폰 강제종료 버튼 이벤트-
아래 메소드가 어플이 종료될 때 수행되는 함수입니다.
종료될 때에 각종 리소스들을 Free시킬 경우에 사용됩니다.
참고하시면 될 듯 합니다~
- (void)applicationWillTerminate:(UIApplication *)application
-os4에서 applicationWillTerminate가 안먹어서 알게된것-
os4에서 applicationWillTerminate: 가 안먹어서 삽질하다가 알아낸 결과입니다.
뒷북 인지는 모르지만 혹시 모르시는 분을 위해서 적어봅니다.
os3.x 에서는 홈버튼을 한번만 누르면 applicationWillTerminate 가 아주 잘 호출됩니다.
하지만 os4 에서는 홈버튼을 한번만 누르면 applicationDidEnterBackground 가 호출됩니다.
os4 에서 멀티태스킹을 위해서 좀 바뀌었습니다.
os4에서도 홈버튼 한번 누를때 applicationWillTerminate 가 호출되게 하려면
info.plist 에서 'Application does not run in background' 이 속성을 추가해주면 됩니다.
위 속성이 없으면 기본적으로 멀티태스킹이 되는걸로 간주합니다. (진짜 멀티태스킹은 아니지만)
위 속성이 없을때 호출되는 메소드를 실험해 봤습니다.
-----------------------------------------------------------------
처음 어플을 실행시키면
didFinishLaunchingWithOptions, applicationDidBecomeActive
이 호출되고
홈버 튼을 한번 만 누르면
applicationWillResignActive, applicationDidEnterBackground
호출되면서 어플이 종료되고
이상태에서 다시 어플을 실행시키면
applicationWillEnterForeground, applicationDidBecomeActive
호출됩니다.
홈버튼을 두번 누르면
applicationWillResignActive
이 호출됩니다.
----------------------------------------------------------------
'Application does not run in background' 을 체크하면
홈버 튼을 한번만 누르면 applicationWillTerminate 를 호출합니다.
'근데 속성 체크 안했을때 applicationWillTerminate 는 호출이 안되는건지 궁금하네요.
아시는 분 좀 알려주세요.
답글 : Applicationwillterminate함수 대신에 applicationDidENterBAckground 사용하라고하네여 이곳에서 공유자원해제나 사용자데이타 저장,타이머 무효화,어플상태정보등 저장을 하라고 합니다. http://cafe.naver.com/mcbugi/65497
-iPhone 4.0 호환 키보드에 버튼 or 뷰 붙이기-
기존꺼에 비해 약간 수정되 었을뿐입니다....
하지만 -_-이거 찾느라 ㅠㅠ;;
3.1.x에서는 windows 서브뷰에 항상 키보드 뷰가 있었지만 ...
4.0 부터는 windows 에 항상 있는게 아니고, 키보드를 불렀을때 -_- 붙어서 오더라고요.. 그래서
Done 버튼 붙이는 예제 입니다. (Number 패드에)
아래 액션을 Text필드의 BeginTouched 에 연결 시킵니다.
// 키보드가 나왔을때랑 사라질때의 이벤트를 잡아냅니다.
//3.1.X 에서는 UIKeyboardWillShowNotification 으로 잡지만
// 4.0 때문에 --; DidShow로 잡아줬습니다.
//그래야 윈도우에 키보드가 있더라고요 ;;;
-(IBAction)FieldTouched{
HttpManager는 URL Loading System Guide 문서를 보고 만든 Class이다.
URL을 String으로 주면, 해당 주소의 웹페이지를 읽어서 NSMutableData로 전달해준다. 이 Tutorial의 경우는 웹 페이지가 image이기 때문에 NSMutableData로 UIImage를 만들면 되고, 페이지가 문자열일 경우는 NSString을 만들어서 처리하면 될 것이다.
HttpManager를 사용하기 위해서는 Caller가 HttpManagerDelegate를 Adopt 하게 했다. Http request 시 callback 되는 method들을 처리해주기 위해서이다.
HttpManager를 들여다보자.
.
HttpManager Class 선언 부
HttpManagerDelegate를 받은 Caller를 받기 위한 delegate와 response data를 받기 위한 received data를 가지고 있다.
HttpManagerDelegate protocol은 http request 시 request가 완료되었을 때와 실패했을 때 callback 되는 method들을 정의하고 있다. 그 외 request 시 callback 되는 NSURLConnectionDelegate의 connection method들은 내부적으로 처리했다.
HttpManager를 initWithUrl로 init 하면 바로 주어진 url의 loading을 시작한다. 즉, url에 대해서 NSURLRequest를 만들고, NSURLConnection 생성해서 loading을 시작한다. 여기서 NSString의 URL을 [NSString stringByAddingPercentEscapesUsingEncoding:]에 NSUTF8StringEncoding을 지정해서 encoding하는 것을 잊지 말아야 한다. 공백이나 특수 문자 등을 ‘%’를 써서 encoding 해준다.
// receivedData is declared as a method instance elsewhere
21
receivedData = [[NSMutableData data] retain];
22
} else{
23
// inform the user that the download could not be made
24
// [todo] error
25
}
26
}
27
28
returnself;
29
}
. [HttpManager connectionDidFinishLoading:]
HttpManager의 다른 method들은 간단하며 HttpManagerDelegate를 adopt 한 caller의 해당 method를 불러주기 위해 caller가 해당 method를 가지고 있는지 체크하는 코드를 보라고 connectionDidFinishLoading method 코드를 보여준다. Caller의 connectionDidFinishLoading method가 불리면 Caller는 HttpManager의 receivedData를 받아서 사용하면 된다.
위에서 설명한 것과 같이 UIImageView를 생성해서 UIWindow에 add하고 UIActivityIndicatorView를 생성해서 UIImageView에 add 후 animation을 시작하고 HttpManager를 picasa url로 init해서 URL Loading을 시작한다.
아이폰 개발시 도움이 되는 각종 팁 , 튜토리얼, 소스코드 링크 모음입니다. 제가 주로 트위터를 통해서 공개한 것들입니다만, 워낙 간헐적으로 트위팅 한듯해서 좀더 링크를 모아서 포스팅 합니다. 한글판 앱스토어 리뷰 가이드라인은 아이폰 앱 개발자분들은 꼭 한번 읽어보셔야 합니다.
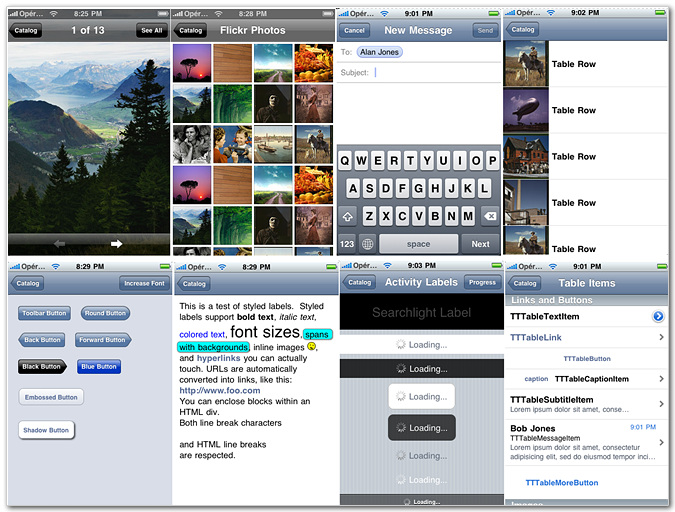
페이스북 아이폰 앱 개발자인 Joe Hewitt 가 공개한 아이폰 앱 개발용 라이브러리 입니다. 깔끔한 포토 이미지 브라우저 , 동적인 웹 데이타 로딩 , 디스크/메모리 기반의 네트웍 캐싱 , 다양한 View 와 Controller들 , 독특한 스타일등 정말 다양한 기능을 제공합니다. Core , Network , UI , Style 네개의 파트로 분리되어 있습니다. 라이브러리가 조금 방대한지라 처음에 적용할때 어려울수가 있는데 “Introduction to Three20” 글을 참고하시기 바랍니다.
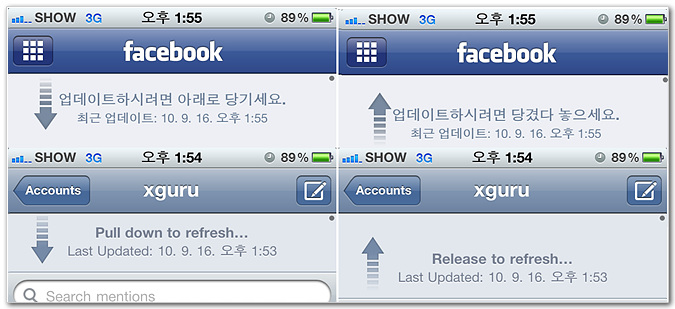
iPhone Pull to Refresh 지금은 공식 트위터 클라이언트가 되어버린 Tweetie 2 버전부터 Pull-to-refresh 라는 기능이 들어갔습니다. 새로운 정보를 읽어올때 리프레시 버튼을 누르는게 아니라 화면을 드래그해서 아래로 내리면 “Pull down to refresh” 라는 말이 나오고 좀더 내리면 리프레시가 되는 방법인데요. 지금은 공식 Facebook 앱에도 이 기능이 들어갔습니다. 한글모드에서는 “업데이트 하시려면 아래로 당기세요.” 라고 나오더군요. 이 방식이 유명해지면서 여러개의 구현코드가 나왔습니다.
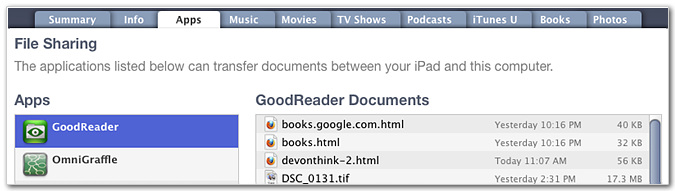
How to integrate iTunes File Sharing with your iOS App iOS 4 그리고 iPad 는 아이폰/아이패드와 PC 간에 File Sharing 이라는 기능을 제공합니다. 앱이 이 기능을 구현하면 iTunes 의 Device / App 창 아래 File Sharing 공간에 앱의 이름이 보이고 그 안에다 직접 파일을 복사할수 있게 해 줍니다. eBook / PDF / Comic 리더 / 비디오 플레이어등이 이 기능을 활용해서 손쉽게 각종 파일을 아이폰/아이패드에 담을수 있게 됩니다. 이 기능을 구현하는 튜토리얼 입니다.
아이폰 메모리 강좌 by 문씨 ( @MoonSungWook ) 좀처럼 보기힘든 한글강좌, 그것도 중요한 메모리 강좌입니다. 아이폰 개발자분들은 필독
iPhone 과 Facebook 연동하기 페이스북연동은 이제 아이폰 앱에선 기본이 되었습니다. 페이스북 연동은 예전 방식인 Facebook Connect 를 이용한 것과 올해 발표된 Graph API 를 이용한것 두가지가 있습니다. 예전 방식 튜토리얼은 여기저기 많은데 Graph API 가 적용된 Facebook-iOS SDK 에 관한 내용은 그리 많지가 않네요.
Uploading UIImages to TwitPic : iPhone 과 Twitpic 연동하기 아이폰 앱에서 Twitpic.com 으로 이미지를 올리는 방법 소스입니다. UIImage 와 NSURLConnection 만을 이용합니다. 다른 사진 업로드들도 비슷하니 참고하시면 됩니다.
아이폰 앱에서 데이타 저장하기 : SQLite , Core Data 아이폰에서 데이터를 저장하는 방법은 여러가지가 있습니다만, 데이터가 많다면 SQLite 또는 Core Data 라이브러리를 이용하게 됩니다. 각각에 대한 예제 들입니다.


